PRISMA
Data Made Easy: Prisma Guide

Prisma is known for being an open-source Object-Relational Mapping (ORM) framework used for database access and management in software development.
Prisma ORM provides a set of tools and libraries that enable developers to interact with databases using
a more convenient and type-safe approach compared to traditional SQL queries. It is designed to work
with various databases, including PostgreSQL, MySQL, SQLite, and SQL Server, making it a versatile
choice for building applications with different database backends.
Before we go any further, let us understand what ORM and ODM’s are.
ORM and ODM’s are two ways of interacting with databases in a programming language. Both of these provide an abstraction layer that allows developers to work with the database using their programming language’s objects, rather than writing raw SQL queries.
In simple terms ODM’s like mongoose are used to interact with document-based databases, such as MongoDB, on the other hand ORM’s like Prisma are used to interact with relational databases such as MySQL.
Now that we have some knowledge about Prisma let us learn to how set it up in a NodeJS project that uses PostgreSQL as the database. (You can use any other database as well).
After the base setup of your NodeJS project is done (either with Typescript or Javascript) :
- Install the prisma package using the command:
npm i prisma- After this run :
npx prisma init This is an important command as it creates two things :
- A schema.prisma file ( under the folder Prisma)where your Prisma Schema will go is generated.
- Creates a .env file at the root of your project, where your database URL will go.
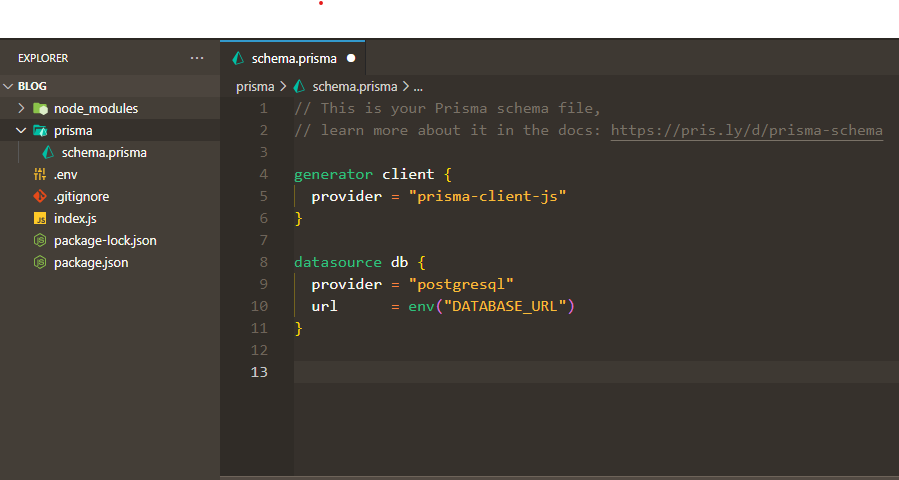
Voila, the base setup of the Prisma is done. Now let’s start defining our Model
generator client {
provider = "prisma-client-js"
}
datasource db {
provider = "postgresql"
url = env("DATABASE_URL")
}
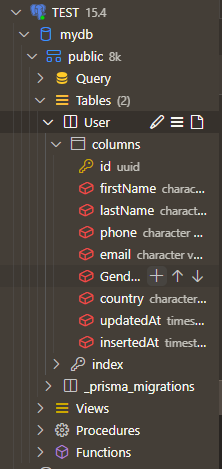
model User {
id String @id @default(uuid()) @db.Uuid
firstName String @db.VarChar(50)
lastName String @db.VarChar(50)
phone String @unique @db.VarChar(16)
email String @unique @db.VarChar(254)
Gender Gender
country String @db.VarChar(50)
updatedAt DateTime @default(now()) @db.Timestamptz(6)
insertedAt DateTime @default(now()) @db.Timestamptz(6)
}
enum Gender {
MALE
FEMALE
OTHERS
}
Now let’s create tables in our Database based on this Model. To do this follow the below commands:
1) Write your database_URL in the .env file like so :
DATABASE_URL="postgresql://username:myPassword@localhost:5432/mydb?schema=public"2) Once this is done, in the terminal run the following command :
npx prisma migrate dev --name initHere init is the custom name of my migration. You can name it anyhow you want.
This command is again an important one.

It maps your data model to the database. In simple words it generate and send the SQL statements for creating the tables that correspond to your data model.
Upon a successful run you terminal should give a response akin to this:
After this Prisma will run prisma generate command automatically. You can also do this on your own by running the command
npx prisma generateThe npx prisma generate command generates TypeScript code and type definitions for database access based on your Prisma schema, enabling type-safe interactions with your database.
Congrats! You have successfully created a table using Prisma!!
The changes will be visible in your respective database like so:

Okay, But how do I insert some values in this table from my NodeJs application you’d ask,
Well you’ll need @prisma/client for this.
Follow the below steps :
First install @prisma/client by running npm I @prisma/client in your terminal
then refer to the following code :
const { PrismaClient } = require("@prisma/client");
const prisma = new PrismaClient();
async function main() {
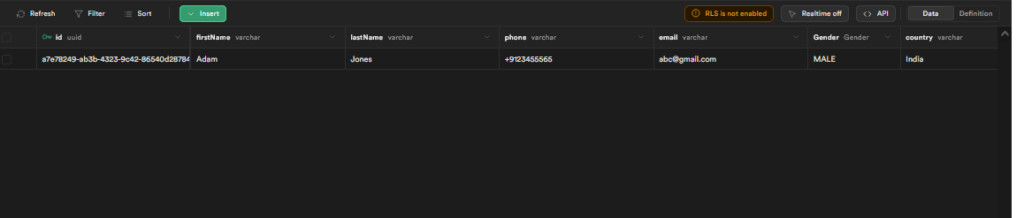
const data = {
firstName: "Adam",
lastName: "Jones",
phone: "+9123455565",
email: "abc@gmail.com",
Gender: "MALE",
country: "India",
};
const newUser = await prisma.user.create({ data });
console.log("Created new user: ", newUser);
const allUsers = await prisma.user.findMany({});
console.log("All users: ");
console.dir(allUsers, { depth: null });
}
main()
.catch((e) => console.error(e))
.finally(async () => await prisma.$disconnect());
( if any errors saying “Invalid prisma.user.create() invocation” arise then simply to the following :
npm i @prisma/client
npx prisma migrate reset -> This will delete all the data and run the migrations again. Don’t run this command if any data is there in your db. However, because we are doing this from the scratch, this shouldn’t cause any concerns
Run the project and verify the new entries in your db
Congrats you have successfully learnt the basics of Prisma!!!
Now let’s create an express application that inserts the data:
Replace the code with this:
const { PrismaClient } = require("@prisma/client");
const prisma = new PrismaClient();
const express = require("express");
const { PrismaClientKnownRequestError, PrismaClientValidationError } =require("@prisma/client/runtime/library");

const app = express();

app.use(express.json());

app.post("/newUser", async (req, res) => {
  const payload = req.body;

  try {
    const newUser = await prisma.user.create({ data: payload });
    console.log(newUser, "newUser");
    res.send(newUser);
  } catch (e) {
    console.log(e, "error");
    if (e instanceof PrismaClientKnownRequestError || e instanceof PrismaClientValidationError) {
        return res.status(200).json({
          error: e.message.split("\n").at(-1)
        });
      }
    else

    res.send(e);
  }
});

app.listen("8000", () => {
  console.log("Server is listening on port 8000");
});
This route will return the inserted new User.
payload for the above route :
{
    "firstName": "Adam",
    "lastName": "Jones",
    "phone": "+9123455568",
    "email": "abc2@gmail.com",
    "Gender": "MALE",
    "country": "India"
  }
Now let’s create a route to fetch a user :
app.get("/allUsers", async (req, res) => {
    try {
      const allUsers = await prisma.user.findMany();

      res.send(allUsers);
    } catch (e) {
      console.log(e, "error");
      if (e instanceof PrismaClientKnownRequestError || e instanceof PrismaClientValidationError) {
          return res.status(200).json({
            error: e.message.split("\n").at(-1)
          });
        }
      else

      res.send(e);
    }
  });
Hitting this route will give you a list of all the users present inside the table named Users
Congrats you have now successfully learnt how to make an express application that uses Prisma to perform operations on the db.
You can now explore more operations from this doc: CRUD operations with Prisma
